| - MRR TUTORIALS - LANDSCAPE - WATER - LAKE & SEA WATER | SITE MAP |
Creating Realistic Water with Toilet Paper and Glue
Water is often one of the last scenic elements added to a model railroad, yet it is also one of the features that attracts the most attention. Lakes, rivers, harbors and coastal scenes immediately draw the viewer's eye and help create a sense of atmosphere and realism. Many modelers hesitate to add water because resin products is very expensive and also difficult to work with. Air bubbles, leaks and long curing times often make water modelling seem more complicated than it really needs to be. This method uses nothing more exotic than toilet paper, white glue, acrylic paint and clear varnish. It is inexpensive, easy to control and produces highly realistic waves and surface texture, which also is durable over time.
Why Build the Waves First?
Most water modelling methods focus on creating a perfectly smooth surface and then adding waves afterwards.
While that approach can produce excellent results, it also requires lots of skills during the final stages of the project. This technique takes a different approach.
Instead of creating waves in the top layer, the wave pattern is built directly into the foundation. The final clear coats simply enhance and reveal the texture already present underneath.
This makes the process easier to control and greatly increases the chances of achieving a convincing result.
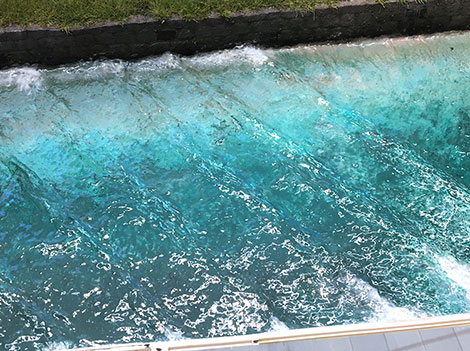
Water effect using Toilet Paper and Glue method
Preparing the Water Surface
The base can be made from plywood, foam board or extruded foam insulation. Since the water surface will be completely covered, the choice of material is not critical.
Begin by applying a generous layer of white glue or wood glue diluted with a small amount of water. This glue mixture acts as the adhesive that binds the toilet paper to the surface.
Place sheets of toilet paper into the wet glue and immediately apply additional glue on top. The goal is to completely saturate the paper.
A second and third layer are then added in exactly the same manner. Every layer should be thoroughly soaked with the glue mixture.
Any embossed patterns, decorative printing or visible seams between sheets should be removed while the paper is still wet.
A soft brush works well for blending the edges together and creating a completely uniform surface.
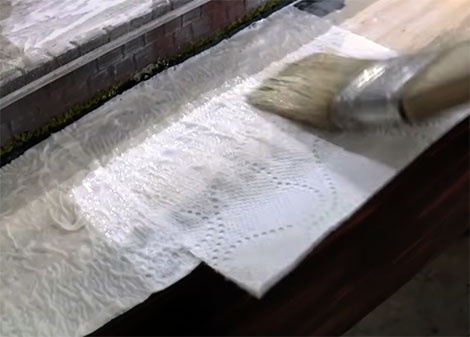
Placing sheets of toilet paper into the wet glue adding more glue on top
Creating Waves and Ripples
Once the third layer has been applied, the fun part begins. Using only a brush, gently push and shape the wet paper to create waves.
The material remains workable for quite some time, allowing plenty of opportunity to experiment.
For lakes and larger bodies of water, long gentle wave patterns often look most convincing.
Coastal scenes may require more pronounced wave action, while rivers typically benefit from directional flow patterns.
One advantage of this method is that objects can be installed directly into the wet surface.
Boats, piers, rocks or bridge supports can be positioned while the paper is still soft. This allows realistic disturbances to be sculpted around the object. A moving boat, for example, can be given a bow wave and wake that become part of the water surface itself. Once satisfied with the shape, leave everything to dry completely before moving on.
Painting the Lakebed
The paintwork is what creates the illusion of depth. Many beginners assume that realistic water comes from the clear gloss layer. In reality, most of the visual effect comes from the colors beneath the surface.
Acrylic paints are ideal for this purpose:
* Green
* Ivory Black
* Burnt Umber
* Titanium White
The shallow areas nearest the shoreline should be painted in lighter brown-green tones. These colors represent the lakebed or seabed visible through the water. As the water becomes deeper, gradually introduce more green and black into the mixture. The deepest areas can be painted almost entirely black. At this stage the paint should be applied relatively thick and without excessive thinning.
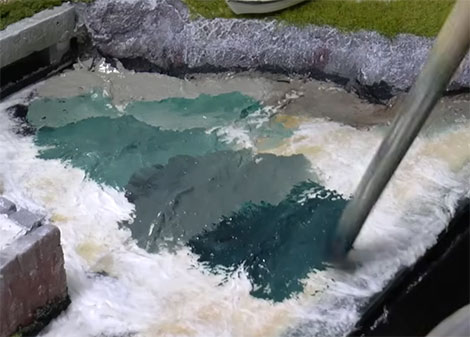
The paintwork is what creates the illusion of depth.
Blending the Colors
Sharp color transitions rarely occur in nature. To blend the various shades together, use a clean brush dampened with water and gently work across the borders between colors. Move from the lighter areas into the darker areas until the transitions become soft and natural. This process creates the illusion of varying water depth and gives the scene a much more realistic appearance. When viewed from above, the finished surface should display subtle variations in color rather than distinct painted sections.
The entire water surface must be allowed to dry thoroughly.
Once the painting is complete, the entire water surface must be allowed to dry thoroughly. This is one of the most important steps in the entire process. Applying clear coats too soon can trap moisture beneath the surface, leading to cracking and milky white decoloration of the paint. Therefore allow the paint to dry for at least 72 hours. A small fan can help speed the process.
Applying the High-Gloss Varnish
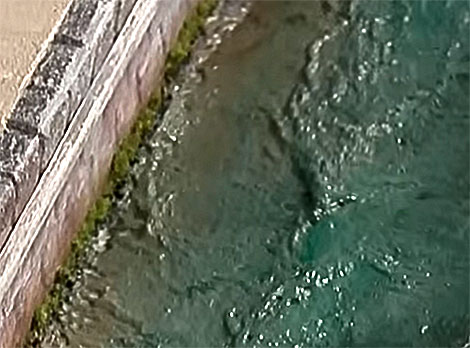
The gloss finish creates the illusion of wetness and transforms the painted surface into convincing water.
A water-based clear varnish is strongly recommended.
Solvent-based products will turn yellow over time and may also react with the acrylic paint underneath. The first layer of clear coat is applied across the entire water surface. Once dry, an additional layer of diluted glue can be added. This increases the visual depth and helps create a richer appearance. After the glue layer has fully cured, several additional coats of clear varnish are applied. Four or more coats are typically required to achieve a deep, highly reflective finish.
Conclusion
Creating realistic water does not require expensive resins or complicated materials. Using little more than toilet paper, glue, acrylic paint and clear varnish, it is possible to produce convincing lakes, rivers and coastal scenes with excellent depth and texture. By building the waves directly into the foundation, carefully painting the lakebed and finishing with multiple layers of gloss varnish, you can create water that looks realistic from every viewing angle while keeping costs low and the process straightforward. Sometimes the simplest materials produce the most convincing results.